Video for Your Selenium Tests Using FFmpeg
Using screenshots for your Selenium tests when they fail is cool, but there are some limitations. For example, it’s hard to know exactly what happened before a failure occurred using a snapshot. In my case, the biggest issue is that our applications sometimes have random modal popups appear that cause the Selenium image to be just a black screen — at least that’s my theory.
The problem is that the image only shows the browser’s viewport, not the full desktop. Rather than a screenshot, I feel that having a video recording would better help me to debug what is actually happening.
My solution is to have our CI system start the recording before our test run, then stop it after the entire test scenario is completed.
Since our test log files are time stamped, we can navigate to that time in the video recording to see what was going on. This method is kind of crude, since it will record nonstop, but it’s a good first step.
To do this we choose FFmpeg. (You could, of course, bypass all this by simply using Sauce Labs, which has a much more advanced video recording option.)
FFmpeg is an open-source, command line video/encoding software utility that allows you to record video and audio of your desktop. The first issue I found with it is that it’s not very clear how to go about installing FFmpeg, and what commands you need to use to create a recording. So, I decided to document what I had to do to get it working on my machine and share it with you.
What you’ll need for recording Selenium test runs:
- FFmpeg
- ScreenCaptureRecorder
- 7-Zip
First, install FFmpeg
- To install, navigate to http://ffmpeg.zeranoe.com/builds/
- Select the static version that you need
- Extract to a location on your hard drive. (I chose C:ffmpeg)
- Next, go to Start>Run and enter sysdm.cpl
- Under the System Properties dialog, click on the Advanced tab
- Next, click on the Environment Variables
- Under the User Variables section, click on the . button
- Under the New User Variable dialog, enter:
- Variable name: path
- Variable value: c:ffmpegbin (or the path the where you unzipped ffmpeg to)
- To verify that ffmpeg is installed, go to Start>Run>cmd
- In the CMD window, type ffmpeg – version
- You should see something like this:
- Next, while you’re still at the command line, type the following to see what video devices, if any, you currently have installed:
ffmpeg –list_devices true –f dshow –i dummy
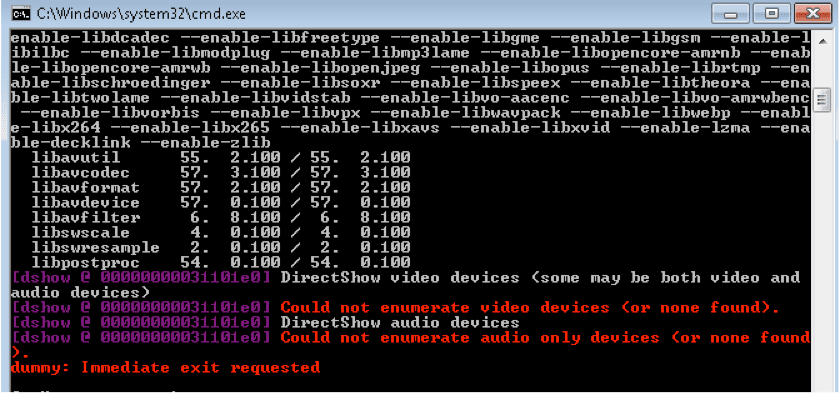
Notice that when I do this I get the error message Could not enumerate video devices (or none found).
This means that my machine doesn’t currently have any DirectShow video devices installed. FFmpeg needs a video device to use in order to record.
Install Screen_Capture_Recorder
The screen capture tool I chose was screen_capture_recorder, because it’s a free, open-source “screen capture” device. If you got the same video device error I did, you can easily install a valid video device by following these steps:
- Navigate to http://sourceforge.net/projects/screencapturer/files/
- Download the latest version
- Once downloaded, double click on the Setup Screen Capturer Recorder V.xx .exe
- Take all the default install options
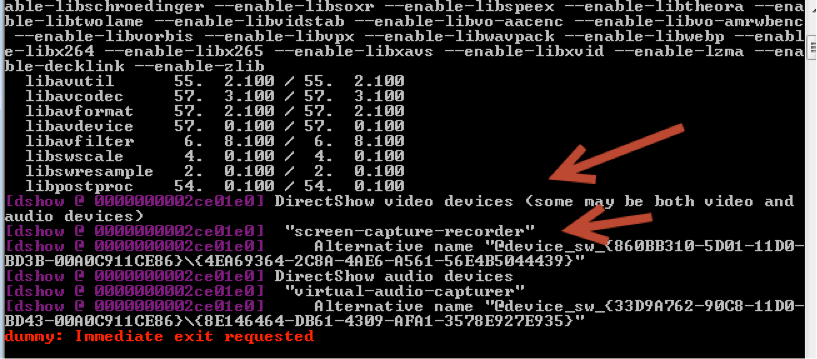
- Once installed, open a cmd.exe window and type:
ffmpeg –list_devices true –f dshow –i dummy
You should now see a valid video device listed:
Cool. Now it’s time to record!
Command to record a screen capture using ffmeg
- Navigate back to a command line window and to the ffmpegbin directory and enter the following:
ffmpeg -f dshow -i video="screen-capture-recorder" -r 30 -vcodec mpeg4 -vtag xvid -qscale:v 0 bddrun.mkv
- Press Q to stop recording
How to view the recording?
Notice how ffmpeg saves the recording as a .mkv file. In order to view it, you’ll need to first convert to an mp4 file.
- Open a command line window
- Navigate to the location of your .mkv file. Mine is under C:ffmpegbin
- Enter the following:
ffmpeg –I name_of_yourFile.mkv –codec copy bddTestRun.mp4
- Navigate to the directory where you converted your file. You should now see a .mp4 version of your recording:
- Double click to play it back
Tips
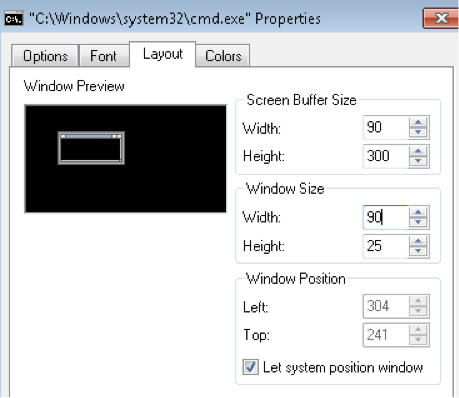
Make sure your cmd.exe screen buffer size has a wide enough width.
Make a recording batch file
Instead of always having to type this command, whenever you want to record, you can create a batch file that contains the ffmpeg record command by following these steps:
- Open up Notepad
- Enter the following:
	@ECHO OFF
        ffmpeg -f dshow -i video="screen-capture-recorder" -r 30 -threads 0 bddrun.mkv
- Save as record.bat