PhantomJs is an opensource browser that runs headlessly. It gives you the ability to create fast scripts using its javascript API to automate a bunch of cool things like:
- Headless website testing – this allows you to run functional tests using frameworks like Jasmine and WebDriver
- Screen Capture – quickly grabs a web page and saves as a screenshot
- Page Automation – PhantomJS has the ability to load and manipulate web pages.
- Network Monitoring – This is really useful to analyze your network behavior and application performance (I’m just diving into what can be done, but it looks very promising and fun!)
The reason I listed some of the functionality you can perform with PhantomJS is to highlight the fact that PhantomJS is not just for testing. You can use it for all kinds of things, including screen-scraping.
Because it’s headless it’s typically much faster, since your tests aren’t required to run and render in a browser.
So now that we have a basic understanding of PhantomJS, let’s actually install it and try a quick test to get started using this automation awesomeness.
NOTE: This is an older post. PhantomJs has been discontinued. Final release: 2.1.1 / January 24, 2016; 6 years ago. I recommend checking out using Playwright in headless mode as a replacement.
Installing PhantomJS on Windows
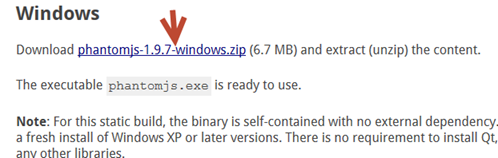
- Navigate to http://phantomjs.org/download.html
- Under the Windows section, click on the download link zip file
- Right click on the downloaded phantomJs zip file to Extract All
- Copy all the contents located in phantomjs-X.X.X-windows
- On your drive, create a new directory structure C: PhantomJsbinphantomjs
- Paste the contents on the extracted phantomjs-X.X.X-windows directory here:
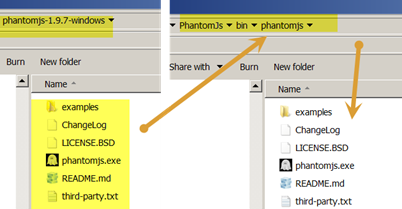
- Copy the path of the phantomjs directory (C: PhantomJsbinphantomjs)
- Right click on my computer and select Properties
- Select Advanced system settings
- Click on the Environment Variables.. button
- Under the System Variables section, find the Path variable
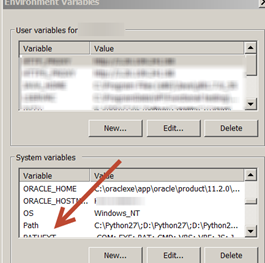
- Click on the Edit.. button
- At the end of the existing Path, add a semicolon (;) and then the path to
C: PhantomJsbinphantomjs
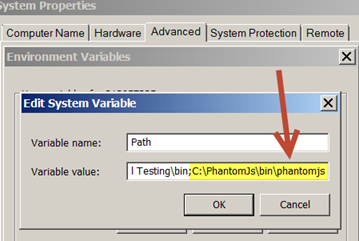
- Click OK
Cool! Now, according to the PhantomJs documentation, we should have all we need to get started since the binary is self-contained and has no external dependencies.
Run a quick PhantomJs test
Now, let’s confirm that PhantomJs is configured and working on our machines.
- Open up Notepad and type the following:
var page = require('webpage').create();
var url = 'https://testguild.com/';
page.open(url, function (status) {
console.log(status);
phantom.exit();
});
- Save as joePhantom.js to your local C drive
-
Open a command line and type: phantomjs joePhantom.js
-
You should see a status of success

If you’re getting Syntax errors, you can use a tool like a javascript Syntax Validator to check for any mistakes or errors you may have made.
What just happened with our PhantomJs script?
PhantomJS has a bunch of built-in modules that allow you to perform different tasks. For our example, we used the web page module, which allowed us to create a webpage instance. Then we used the open method to open joecolantonio.com.
This method also returns the page status (success or fail) depending on whether the page is loaded with issues or not.
For a list of all the methods, available check out the phantomJS API documentation.